Securely attach boards to line, choose right one for conditions, and use release clip. Adjust distance and position for depth. Tense clip gently, check for slipping, and fix if needed. Maximize distance by setting optimal angle and adjusting line. Experiment with different designs for specific needs. Vary adjustments and weights for control. Try different speeds and angles for best results. Experimentation is key to mastering planer boards.
Setting Up Your Planer Boards
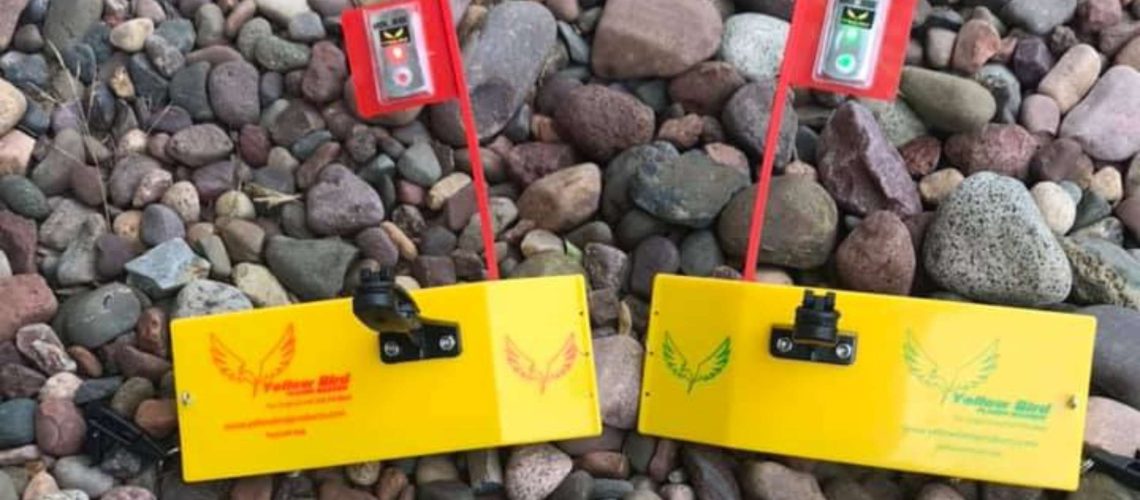
To set up your planer boards effectively, ensure you attach them securely to your fishing line before hitting the water. Start by selecting the appropriate planer board for the conditions you’ll be fishing in. Once you’ve chosen the right board, attach it to your main line using a release clip. Make sure the release clip is secure to prevent the board from detaching unexpectedly. Adjust the distance between the board and your lure based on the fishing depth you’re targeting. A general rule of thumb is to position the board further from the boat for deeper waters.
After securing the planer board to your line, let out enough line to achieve the desired distance between your lure and the board. Keep in mind that different types of planer boards may require slightly different setups, so always refer to the manufacturer’s instructions for specific guidance. Once everything is in place, you’re ready to start trolling with your planer boards effectively set up for a successful fishing trip.
Adjusting the Tension Correctly
Adjust the tension on your planer board by gently adjusting the release clip until it holds securely in place. The tension should be just enough to keep the line from slipping through, but not too tight that it hinders the board from moving outwards. To test the tension, pull on the line gently to ensure it doesn’t release unintentionally.
If the line slips, adjust the tension slightly until it holds firm. Proper tension is crucial for the planer board to perform effectively, allowing it to glide smoothly through the water without being dragged down. Finding the right balance will ensure your planer board stays in position while fishing, maximizing its efficiency.
Remember that different conditions, such as wind or current, may require adjustments to the tension to maintain optimal performance. By mastering the art of adjusting the tension correctly, you can enhance your planer board fishing experience and increase your chances of a successful catch.
Maximizing Distance With Planer Boards
When aiming to maximize distance with planer boards, ensure that the line is set at an optimal angle to achieve the furthest reach while maintaining control over your fishing setup. By adjusting the angle of the line, you can increase the distance between your boat and the bait, allowing you to cover more water effectively. It’s crucial to find the sweet spot where the line isn’t too steep or shallow in the water, ensuring that the board tracks smoothly while still being able to detect bites easily.
Additionally, using lighter tackle and reducing drag on the line can help you achieve greater distances. Lighter lines create less resistance in the water, allowing the planer board to glide farther away from the boat. Be mindful of wind direction and speed, as these factors can affect how far your planer board can travel. By paying attention to these details and making adjustments as needed, you can maximize the distance covered by your planer boards and increase your chances of landing that big catch.
Understanding Different Planer Board Designs
Explore the variety of designs available for planer boards to enhance your fishing experience. Different planer board designs offer unique features and functions tailored to specific fishing situations. Inline planer boards are ideal for calm waters and allow for easy maneuvering, while double planer boards provide increased stability in rougher conditions.
Side planers are great for trolling multiple lines at varying depths, maximizing your chances of hooking fish. Mini planer boards are perfect for targeting smaller species or when space is limited on your boat. Adjustable keel planer boards offer versatility by allowing you to adjust the depth and angle of your lines.
Consider the type of fishing you plan to do and the conditions you’ll be facing to choose the right planer board design for your needs. Experimenting with different designs can help you optimize your fishing setup and increase your chances of a successful day on the water.
Tips for Using Planer Boards Effectively
Experiment with different planer board adjustments to optimize your fishing setup and increase your chances of a successful day on the water. Start by adjusting the distance between the planer board and your boat. A general rule is to keep it far enough to prevent spooking the fish while still being effective.
Vary the weight you attach to the planer board to control how far it runs from your boat. Lighter weights will keep the board closer, while heavier weights will take it farther out. Adjust the angle of the planer board to the water’s surface to fine-tune its tracking ability. A more vertical angle is suitable for rough waters, while a flatter angle works better in calm conditions.
Don’t forget to experiment with different speeds to see how they affect the planer board’s performance. By making these adjustments and paying attention to how the planer board behaves, you’ll be able to maximize your fishing efficiency and enjoy a productive day out on the water.
Get The Best Gear For Your Next Fishing Adventure With Yellow Bird Fishing Products
Mastering the use of planer boards can significantly enhance your fishing success by allowing you to cover more water and present your bait in a natural and effective manner. With the right tips and techniques, you can maximize your chances of a great catch.
Yellow Bird Fishing Products offers top-quality planer boards and expert advice to help you become a more effective angler. Contact Yellow Bird Fishing Products at (815) 469-9686 today


